Headless mode is a very new and exciting concept. The theory is this:
- WPEForm provides a GraphQL API that can be accessed from sites except your WordPress installation.
- You leverage the API and query form data from your web or mobile apps.
- You send new submission mutations to the GraphQL API to record form submissions.
This is possible because WPEForm was developed with API in mind. Even the WordPress application is powered by the same GraphQL API. Common usages would be:
- Render forms in your own applications.
- Add an interactive form in your static site, deployed over CDN.
etc.
So let's see how we enable the app mode. Please note that the headless mode works with ALL VERSIONS of WPEForm (including FREE version).
Enable Headless mode in wp-config.php
By default, the GraphQL API is secured with a WordPress nonce. This prevents the API going completely headless. But do not worry, our API is secure even without the nonce. That is an extra protection we've put so that the API cannot be queried from outside, if you do not wish so.
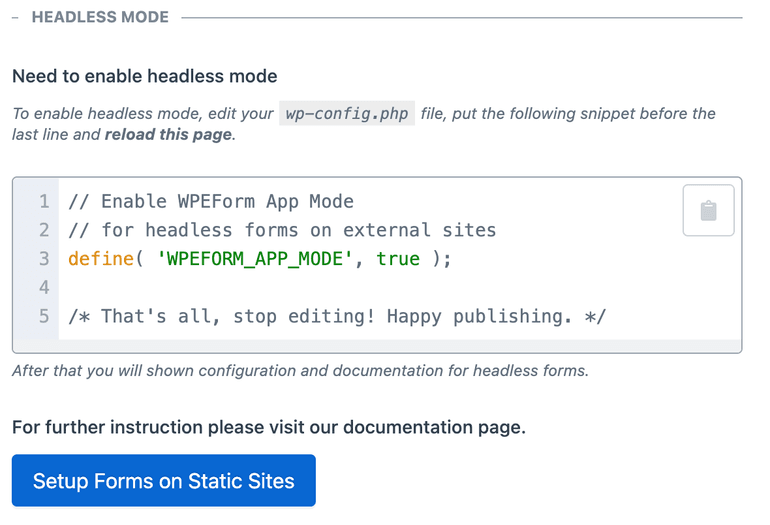
When you visit WPEForm Settings System you will see something like this in the Headless mode section.

As the instruction says, we are going to enable the App Mode or Headless Mode.
First edit the wp-config.php and put the following code.
1define( 'WPEFORM_APP_MODE', true );
Copied!
- WPEFORM_APP_MODE: Set the value to true and the API will go headless. It can now be queried from anywhere.
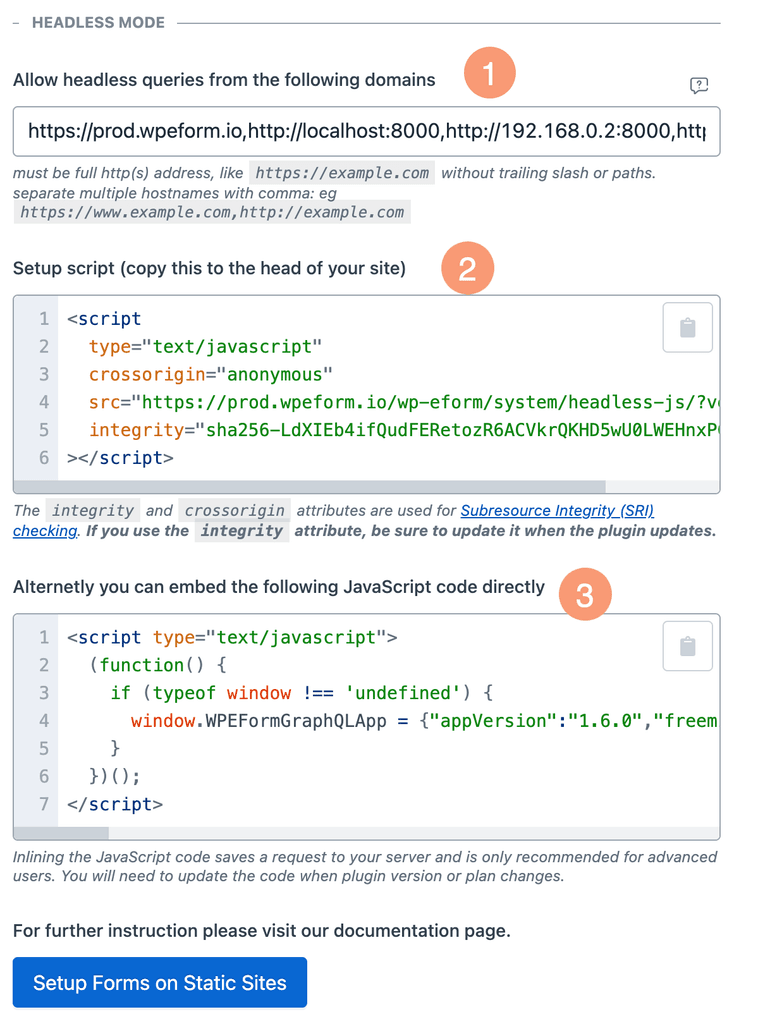
And that's it. Now when you visit WPEForm Settings System you will see setup instruction like this.

Now the important part is to add CORS trusted domains. Enter comma separated list of full website address where you will be rendering your forms.
For example, we use WPEForm in prod.wpeform.io and we render the forms in headless mode, here in this website as well as on localhost when testing. So we have the following value in the settings.
1https://www.wpeform.io,https://wpeform.io,http://localhost:8000
Copied!
It is important that the value starts with https:// or http:// and contains
the full domain name. Do not add paths or trailing slashes after the site
address.
Rendering Forms in headless mode with React
Now that our basic setup is done, we proceed to actually render the forms. For now Forms can be only be rendered inside react applications or sites using react. This guide will focus on create react app and gatsby.
First we need to get hold of the global variables that our renderer would need. It is available from the same settings page (Check image annotation 2) and looks something like this:
1<script2 type="text/javascript"3 crossorigin="anonymous"4 src="https://prod.wpeform.io/wp-eform/system/headless-js/?version=1.6.0"5 integrity="sha256-LdXIEb4ifQudFERetozR6ACVkrQKHD5wU0LWEHnxPCY="6></script>
Copied!
It basically puts a JavaScript variable WPEFormGraphQLApp on the page where
you'd like to render forms. Our rendering library depends on it.
The script above will hotlink a dynamically generated JS file. The attributes
crossorigin and integrity makes sure that the file isn't tampered with, when
embedding in third-party sites.
You can also inline the response of the JavaScript file. The inline value is also shown in image annotation 3. It looks something like this.
1<script type="text/javascript">2 (function () {3 if (typeof window !== 'undefined') {4 window.WPEFormGraphQLApp = {"appVersion":"1.6.0","freemius":{"canUsePremiumCode":true,"isTrial":false,"isPlanStarterOnly":false,"isPlanProfessionalOnly":false,"isPlanBusinessOnly":true,"isPlanStarterOrHigher":true,"isPlanProfessionalOrHigher":true,"isPlanBusinessOrHigher":true},"gqlUri":"https://prod.wpeform.io/wp-eform/graphql/","userPortal":"https://prod.wpeform.io/wp-eform/system/submissions/","summaryPage":"https://prod.wpeform.io/wp-eform/system/summary/?mode=preview"};5 }6 })();7</script>
Copied!
If you are worried about bandwidth usage, then go with option 2 (embed JavaScript code), otherwise embedding the script file is a good idea.
There are several ways to add this to the target website. Let's see them.
Adding setup script to create-react-app
Edit the index.html of the public directory and copy-paste the setup script
as is. It may look something like this.
1<!DOCTYPE html>2<html lang="en">3 <head>4 <title>My Awesome React App</title>5 <script6 type="text/javascript"7 crossorigin="anonymous"8 src="https://prod.wpeform.io/wp-eform/system/headless-js/?version=1.6.0"9 integrity="sha256-LdXIEb4ifQudFERetozR6ACVkrQKHD5wU0LWEHnxPCY="10 ></script>11 </head>12</html>
Copied!
More information can be found here .
Adding setup script to gatsbyjs
Our website is powered by Gatsby and we love it
very much. Gatsby has a
gatsby-ssr
API which we will use to add the setup script.
Edit or create the gatsby-ssr.js file in your project. We need to modify the
onRenderBody export. It will look like this.
1import React from 'react';23// a react component to render the script4function WPEFormSetupScript() {5 return (6 <script7 type="text/javascript"8 src="https://prod.wpeform.io/wp-eform/system/headless-js/?version=1.6.0"9 crossOrigin="anonymous"10 integrity="sha256-LdXIEb4ifQudFERetozR6ACVkrQKHD5wU0LWEHnxPCY="11 />12 );13}1415// modify the onRenderBody to add our setup script16export const onRenderBody = ({ setHeadComponents }) => {17 setHeadComponents(<WPEFormSetupScript key="js-var" />);18};
Copied!
Adding setup script to nextjs
Just like gatsby, next js also exposes some API to add script tag. You can either add the setup script on pages where you actually render the form, or globally. Do check the official documentation for guidance.
In our example, we will add the setup script to our index page.
1import Head from 'next/head';23function IndexPage() {4 return (5 <div>6 <Head>7 <script8 type="text/javascript"9 src="https://prod.wpeform.io/wp-eform/system/headless-js/?version=1.6.0"10 crossOrigin="anonymous"11 integrity="sha256-LdXIEb4ifQudFERetozR6ACVkrQKHD5wU0LWEHnxPCY="12 />13 </Head>14 <p>Hello world!</p>15 </div>16 );17}1819export default IndexPage;
Copied!
Now that our setup is ready, let us see how to actually render the form.
Install WPEForm rendering library
We have published the npm package @wpeform/react which you can use to render forms on your react websites or apps.
We install the library along with its peer dependencies with the simple command below.
1npx install-peerdeps @wpeform/react
Copied!
If you wish to install all the peer dependencies yourself, use the following command.
1npm install @wpeform/react \2 react \3 react-dom \4 react-is \5 react-latex-next \6 styled-components \7 query-string \8 @fortawesome/fontawesome-svg-core \9 @fortawesome/free-brands-svg-icons \10 @fortawesome/free-regular-svg-icons \11 @fortawesome/free-solid-svg-icons \12 @fortawesome/react-fontawesome \13 @apollo/client \14 @react-spring/web \15 zustand \16 @use-gesture/react
Copied!
Getting the Form Id to render
We will need the form id we need to render. Form id can be realized easily from the edit screen of your WordPress Admin.
When you edit a form, the URL is usually this
1https:/yoursite/wp-admin/admin.php?page=wpeform#/forms/edit/24
Copied!
Notice the last 24 in the URL. That is the form id.
Rendering the form
Now with everything setup, let's render the form. First we import the component from the package.
1import { WPEForm } from '@wpeform/react';
Copied!
Now we render it where we want. Here's an example with a sample page.
1import React from 'react';2import { WPEForm } from '@wpeform/react';34export default function App() {5 return (6 <div>7 <h2>Behold my headless form</h2>8 <WPEForm formId="24" />9 </div>10 );11}
Copied!
And this is it. The component WPEForm accepts the following props.
1type ThemeStyle = {2 scheme?: string;3 baseFont?: number;4 boldHeading?: boolean;5 italicHeading?: boolean;6 headFamily?: string;7 headFamilyCustom?: string;8 bodyFamily?: string;9 bodyFamilyCustom?: string;10 customPrimaryColor?: string | null;11 customSecondaryColor?: string | null;12 customBackgroundColor?: string | null;13 customTextColor?: string | null;14 css?: string | null;15 maxWidth?: string;16 containerLayout?: SettingsAppearanceContainerLayoutEnum;17 darkMode?: DarkThemeModeEnum;18};1920type WPEFormProps = {21 /**22 * The form Id to render.23 */24 formId: string | number;25 /**26 * Styles as received from server side render.27 */28 themeStyle?: ThemeStyle | null;29 /**30 * Number of panels for skeleton.31 *32 * @default 233 */34 panels?: number;35 /**36 * Number of controls for skeleton.37 *38 * @default 339 */40 controls?: number;41 /**42 * Whether or not to override darkMode in forms. Works only if the theme43 * has support for dark mode.44 *45 * undefined - No changed behavior, follow from the form config.46 * true - Render form in dark mode.47 * false - Render form in light mode.48 */49 overrideDarkMode?: boolean;50};
Copied!
Do note the object you can pass to the themeStyle prop. Depending on it the
form preview skeleton will be rendered.
Live Form Example
Now, for fun, since our website is already setup with headless mode, here's a live form.
This code was used to render the above form:
1<WPEForm2 formId="24"3 panels={2}4 controls={5}5 themeStyle={{ scheme: 'prempurple', maxWidth: '600px' }}6/>
Copied!
If you are thinking what trickery we've used for automatic darkmode in sync with
the site, we've basically used the overrideDarkMode prop on WPEForm
component. See this tutorial to
learn how we've added dark mode to our site.
Rendering forms in headless mode without react
Right now, we have only published the react library for rendering. Please stay tuned while we prepare and publish the general web library.